はじめに
RunBookAutomationや Code As Infrastructureという単語をよく耳にする今日この頃。 仕事でなにかと手順書を作成することがだれにでもあるはず。
今日は、文芸的プログラミングと、RunBookAutomationの概念を合体させて、 Web操作の作業手順書を自動作成してみます。
これは、以下の記事の続編です。つまり、selenium-webdriverを Web操作自動化のためのエンジンとして利用します。
以下の過去記事と関係があります。
出力のためのツール org-babel
Ruby Codeに出力
org-babelを利用して出力するには、rubyのcodeを以下のように囲む。
#+begin_src ruby :tangle ./hello_rba.rb :exports none
- begin_src ruby … rubyのコード
- :tangle ./hello_rba.rb … rubyの出力ファイル指定
- exports none … org-modeのexport機能ではcodeをexportしない。
Rubyコードに書き出すには、以下を実施。
M-x org-babel-tangle
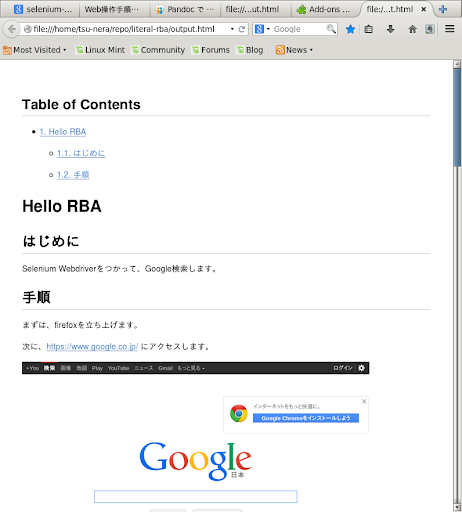
これで、動作する手順書(RBA)が自動生成される。
HTMLに出力
org-export-dispatchから htmlを選択することで、htmlに変換可能。
このとき:exports noneのオブションのおかげで、rubyのコードは出力されない。
github風にオシャレな出力
pandocを利用して md から htmlに変換することで、cssがつかえる。
このデザインがとても気に入った!Special Thanks
wget https://gist.github.com/andyferra/2554919/raw/2e66cabdafe1c9a7f354aa2ebf5bc38265e638e5/github.css
pandoc hello_rba.md -c github.css -s -o hello_rba.html
PDFに出力
pandocを利用してpdfに変換したかったけど、深刻な容量不足のため断念。
代替手段として、firefoxのプラグインでHTMLをpdfに変換した。
スクリーンショットを撮影
selenium-webdriverには、スクリーンショット撮影機能がある。
これを手順ごとに実施して、画像ファイルもorg-modeに含める。
wd.save_screenshot('screenshot.png')
org-modeにはこんな感じで書く
[[./screenshot.png]]
これで、画像がついてよりわかりやすくなった。
Code
RunBook
表示のために、冒頭に#を入れています。
#   * Hello RBA
#
#   ** はじめに
#   Selenium Webdriverをつかって、Google検索します。
#
#   #+begin_src ruby :tangle ./hello_rba.rb :exports none
#   require 'pp'
#   require 'selenium-webdriver'
#   #+end_src
#
#   ** 手順
#   まずは、firefoxを立ち上げます。
#
#   #+begin_src ruby :tangle ./hello_rba.rb :exports none
#   wd = Selenium::WebDriver.for :firefox
#   #+end_src
#
#   次に、https://www.google.co.jp/ にアクセスします。
#
#   #+begin_src ruby :tangle ./hello_rba.rb :exports none
#   wd.get "https://www.google.co.jp/"
#   wd.save_screenshot('screenshot.png')
#   #+end_src
#
#   [[./screenshot.png]]
#
#   次に、検索窓に以下を入力します。
#
#   - "Selenium Builder"
#
#   #+begin_src ruby :tangle ./hello_rba.rb :exports none
#   wd.find_element(:id, "lst-ib").click
#   wd.find_element(:id, "lst-ib").clear
#   wd.find_element(:id, "lst-ib").send_keys "Selenium Builder"
#   wd.save_screenshot('screenshot2.png')
#   #+end_src
#
#   [[./screenshot2.png]]
#
#   最後に、検索ボタンを押します。
#
#   #+begin_src ruby :tangle ./hello_rba.rb :exports none
#   wd.find_element(:name, "btnK").click
#   #+end_src
#
#   #+begin_src ruby :tangle ./hello_rba.rb :exports none
#   sleep 3
#   wd.save_screenshot('screenshot3.png')
#   wd.quit
#   #+end_src
#
#   [[./screenshot3.png]]
生成したCode
require 'pp'
require 'selenium-webdriver'

wd = Selenium::WebDriver.for :firefox

wd.get "https://www.google.co.jp/"
wd.save_screenshot('screenshot.png')

wd.find_element(:id, "lst-ib").click
wd.find_element(:id, "lst-ib").clear
wd.find_element(:id, "lst-ib").send_keys "Selenium Builder"
wd.save_screenshot('screenshot2.png')

wd.find_element(:name, "btnK").click

sleep 3
wd.save_screenshot('screenshot3.png')
wd.quit
Sample
